
By

Lumanu
Jul 23, 2024
How to pay creators and freelancers if your company uses Coupa
Comprehensive Guide to Onboarding Influencers to Coupa
Onboarding influencers to Coupa can be a time-consuming process. This guide will walk you through each step in detail, ensuring a thorough understanding of the typical process and requirements involved.
Part 1 covers the steps by the marketing team and Part 2 covers the steps that influencers must take during their onboarding process. Many companies build out a pdf laying out the step by step process, we’ve included example screenshots from publicly available onboarding guides used in practice.
When managing a few freelancers, this process is manageable. As the number of freelancers scale it may be time to consider using a specialized platform like Lumanu that works alongside Coupa as a master vendor for influencer and other marketing freelancer onboarding and payments, providing a more efficient and streamlined process.
Part 1: Marketing Team's Interaction with Influencers to Get Them Setup as Vendors in Coupa
Step 1: Set Expectations with Influencers
Communication
Prepare and handoff an onboarding guide (Part 2 contains detailed steps)
Communicate with influencers to ensure they understand the process and that they receive the email invitation from Coupa.
Guide them through the account creation and profile completion steps if needed.
Step 2: Initiating the Onboarding Process
Requesting Onboarding
Fill out a New Supplier Request Form to initiate the influencer onboarding process.
Submit the form to trigger the Supplier External Update Form which will notify your vendor.
Step 3: Contract Preparation and Approval
Drafting Contracts
Use Coupa’s contract request interface to prepare agreements.
Submit the draft for approval through Coupa, ensuring all necessary senior leadership and departmental heads review and sign off.
Handling Feedback
Address any feedback or changes requested by finance or legal departments.
Step 4: Influencer Onboarding
Vendor Setup
Once the contract is approved, onboard the influencer in the Coupa system.
Ensure all financial documents (e.g., W9, banking details) are collected and uploaded.
Step 5: Creating Purchase Orders (POs)
PO Generation
After the influencer is set up as a vendor, generate a Purchase Order (PO) for the influencer.
Ensure the PO includes all necessary details, such as services provided and payment terms.
Step 6: Managing Invoices and Payments
Invoice Submission
Inform influencers to generate and submit invoices through Coupa, ensuring they include the PO number.
Once submitted, verify that the invoices match the PO details and approve them in the system.
Payment Processing
Coordinate with the finance team to ensure timely processing of payments according to the agreed terms.
Ensure there is an emergency onboarding and manual entry process in place to use when necessary to expedite payments.
Step 7: Monitoring and Troubleshooting
Tracking and Reporting
Maintain a tracker (i.e. spreadsheet) to monitor the status of contracts, POs, and payments.
Address any issues or discrepancies that arise, working with influencers and the finance team to resolve them promptly.
Accruals and Reconciliations
Ensure all expenses are correctly communicated to Finance to be accrued and reconciled in the system, matching invoices to the appropriate budget months.
Part 2: Influencer Onboarding Process
Step 1: Setting up a New Supplier Profile on Coupa
Email Invitation
Influencers will receive an email invitation from Coupa (do_not_reply@supplier.coupahost.com) with the subject line: "You are Connected to [Company] on Coupa."
Login to Coupa
Click the Login to Coupa button from the invitation email.

Step 2: Creating an Account
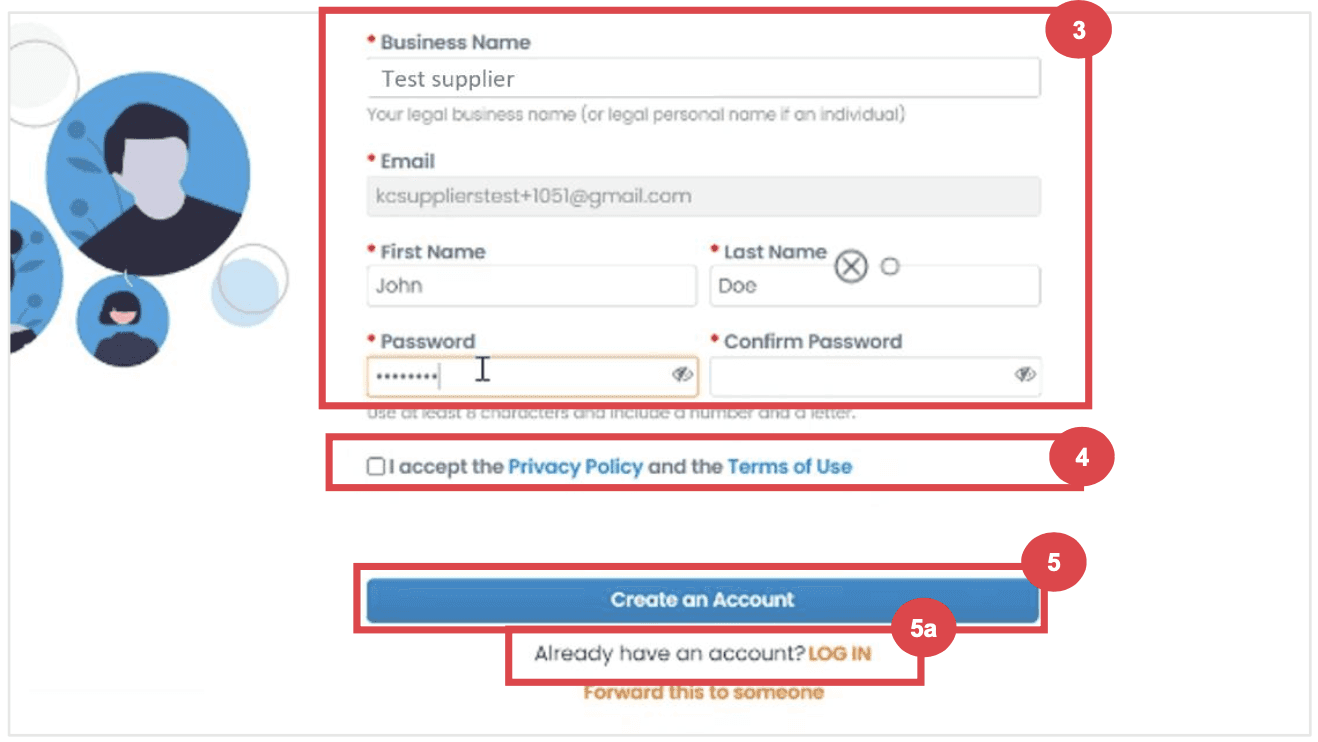
Account Information
Enter the required information:
Business Name
Email address
First Name (primary contact)
Last Name (primary contact)
Password (alphanumeric, minimum 8 characters)
Accept the Privacy Policy and Terms of Use by checking the corresponding box.
Click the Create an Account button.
Click Log In if you have an existing account
Step 3: Completing Company Information
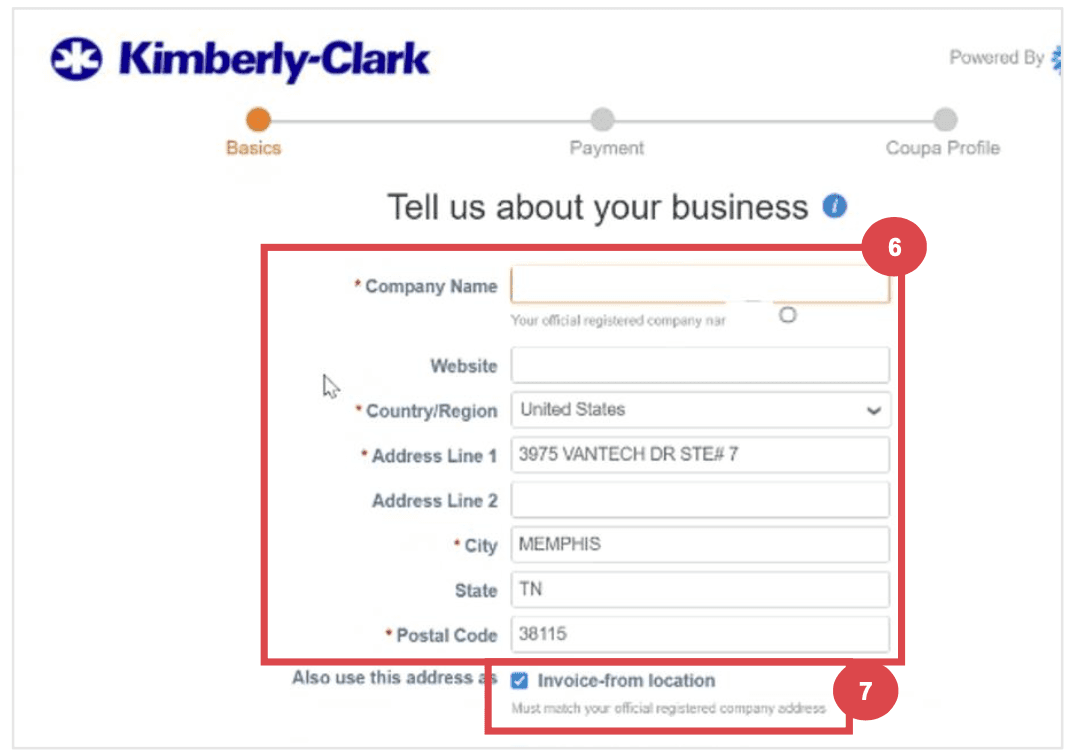
Business Details
Enter your business details in the required fields:
Company Name
Country/Region
Address
City
State
Postal Code
Check the Invoice-from location box if the address is your invoice address.
Deselect the Pay to location (Remit-To) and Ship from location checkboxes if they do not apply.
Select the We support integration for invoicing checkbox if you plan to use cXML or SFTP transactions.
Step 4: Entering Tax Information
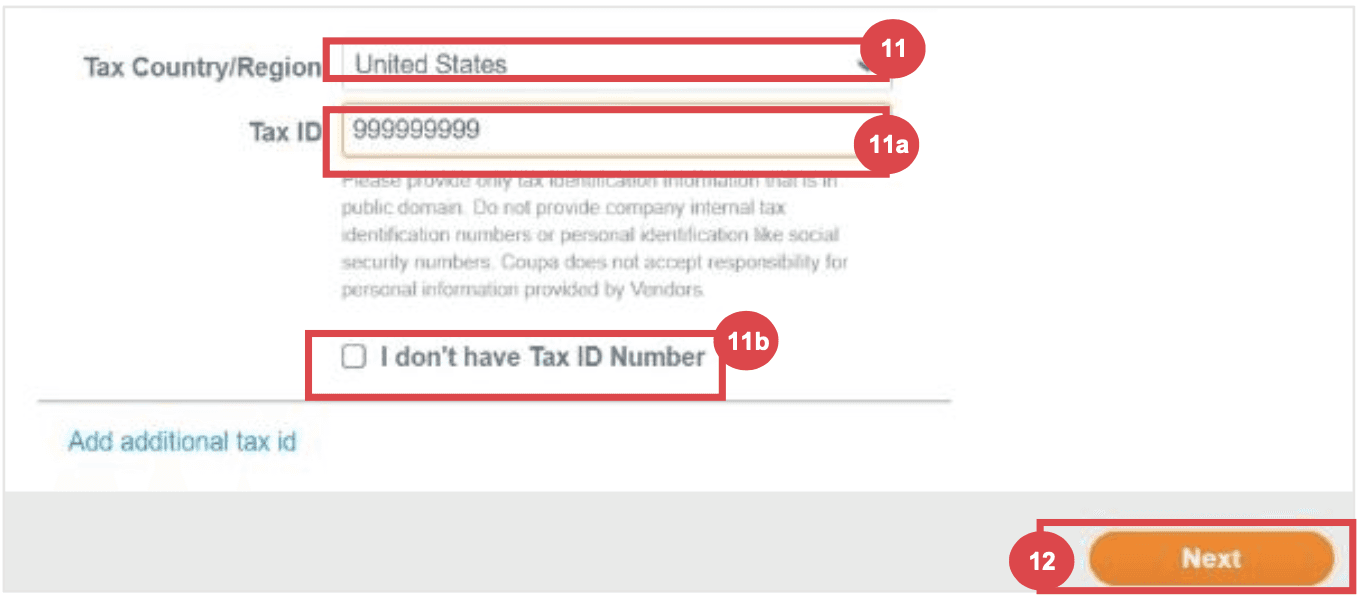
Tax Details
Select your tax country/region from the dropdown list.
Enter your Tax ID information or select the I don’t have a Tax ID Number checkbox if applicable.
Click the Next button.
Step 5: Payment Discount Preferences (if enabled)
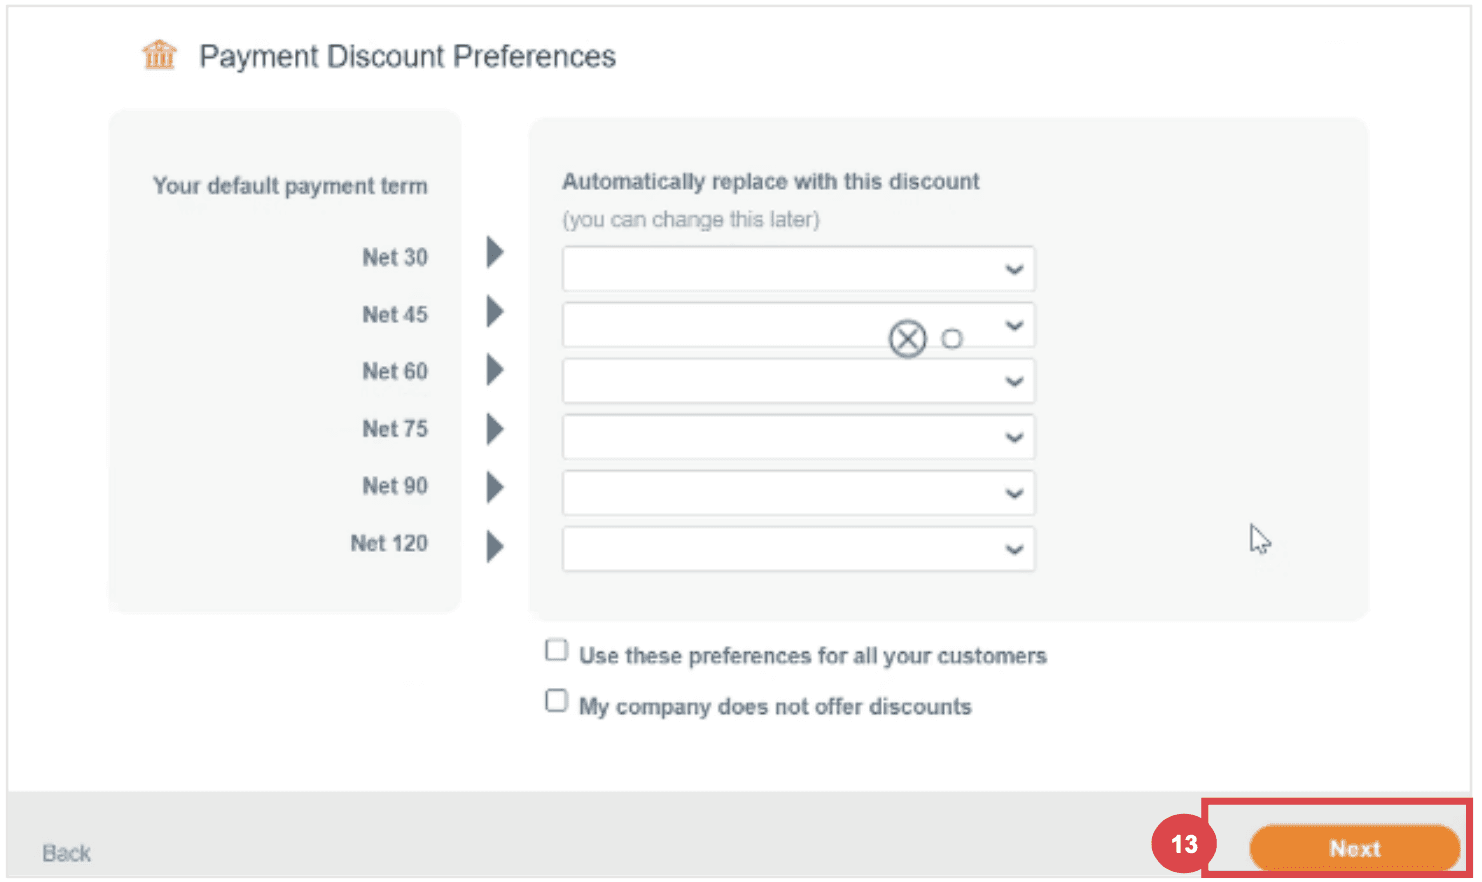
Preferences
Click Next within the Payment Discount Preferences pop-up without entering any information.
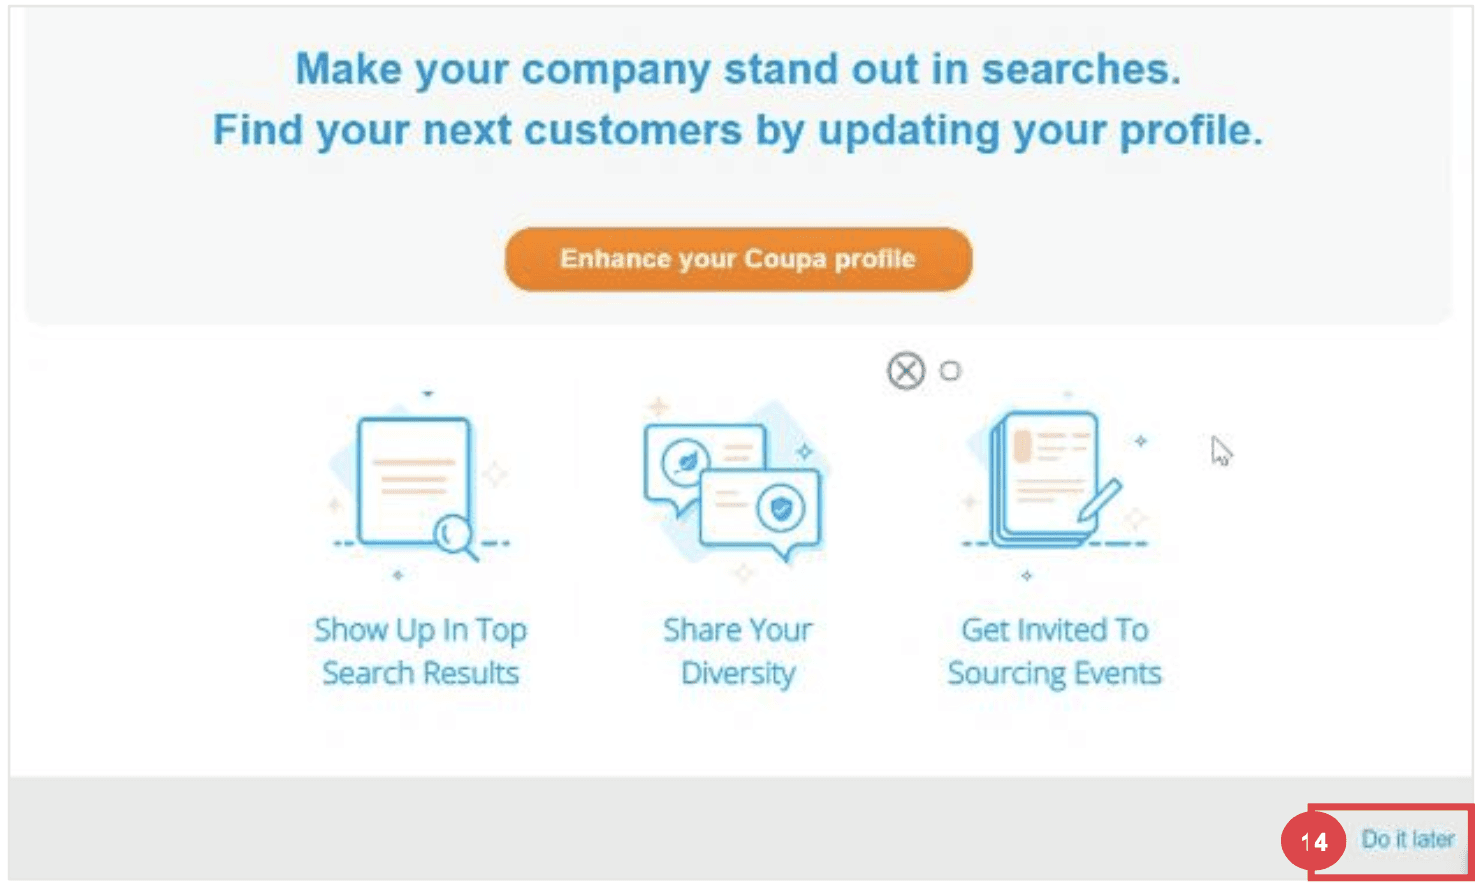
Step 6: Coupa Profile Enhancement
Profile Enhancement
Select Do it later on the Enhance your Coupa profile screen. Enhancements are optional and not necessary for registration.
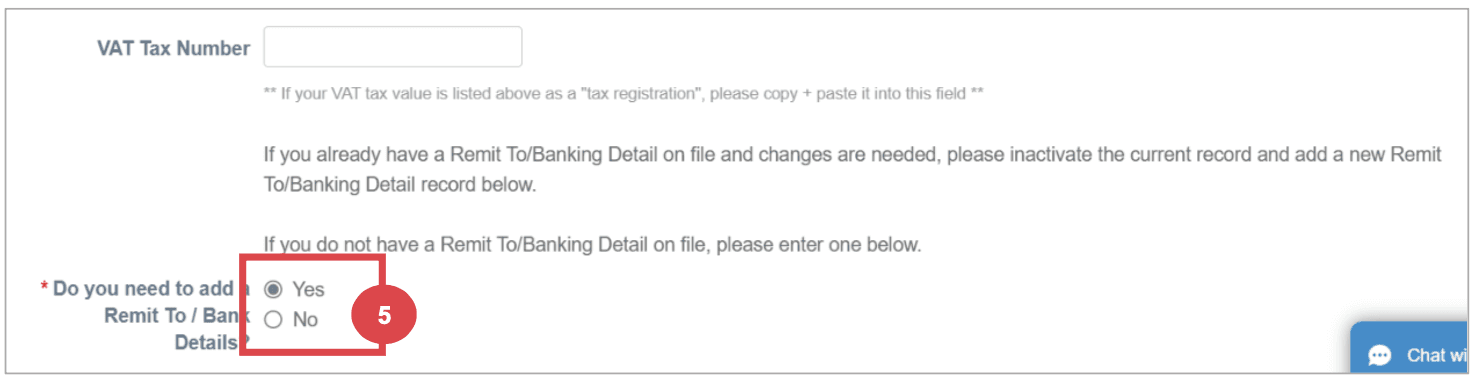
Step 7: Add remit to and banking details
Select the radio button option Yes or No for the Do you need to add a Remit To/Bank Details? question to add or update banking information.
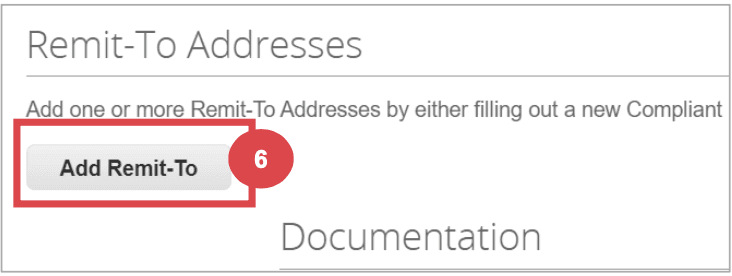
Click the Add Remit To button to add or update banking information.
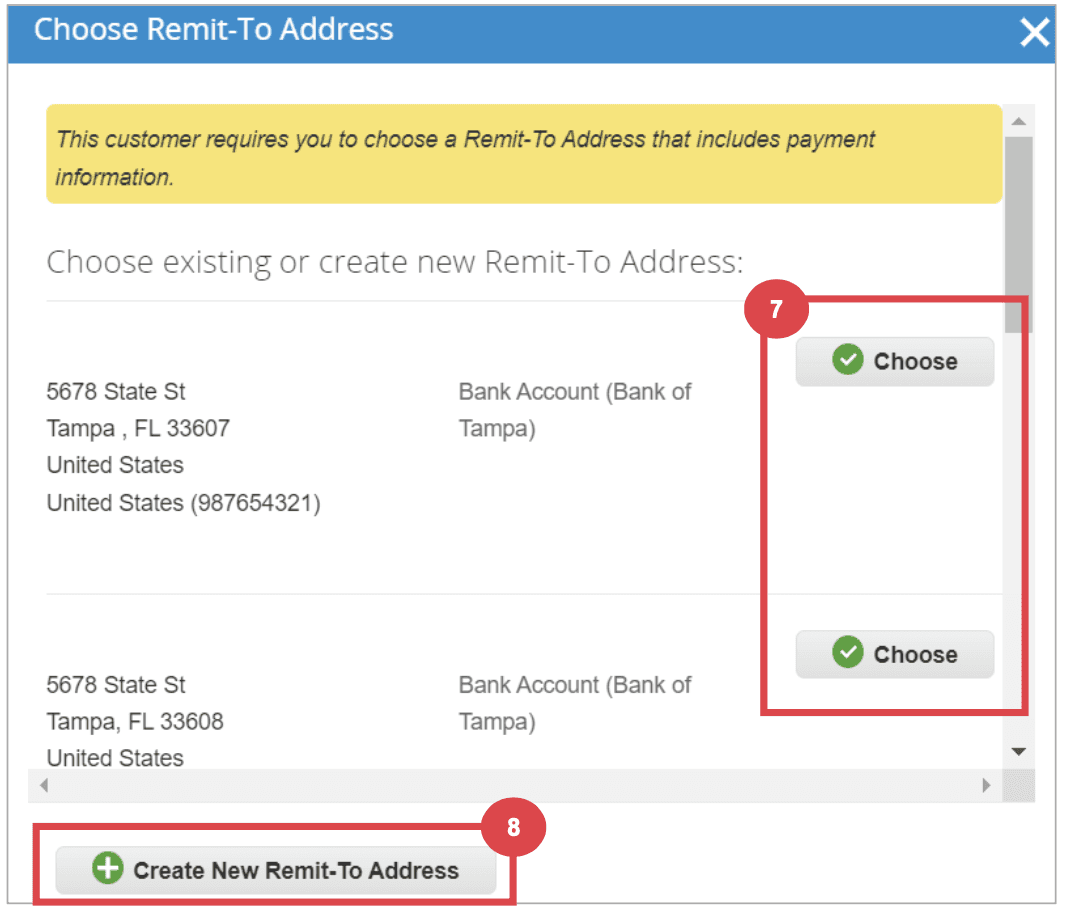
The Choose Remit-To Address screen appears.
a. Click the Choose button to add existing banking information.
b. Click the Create New Remit-To Address button to add new banking information.
Step 8: Updating an Existing Supplier Profile
Email Invitation for Updates
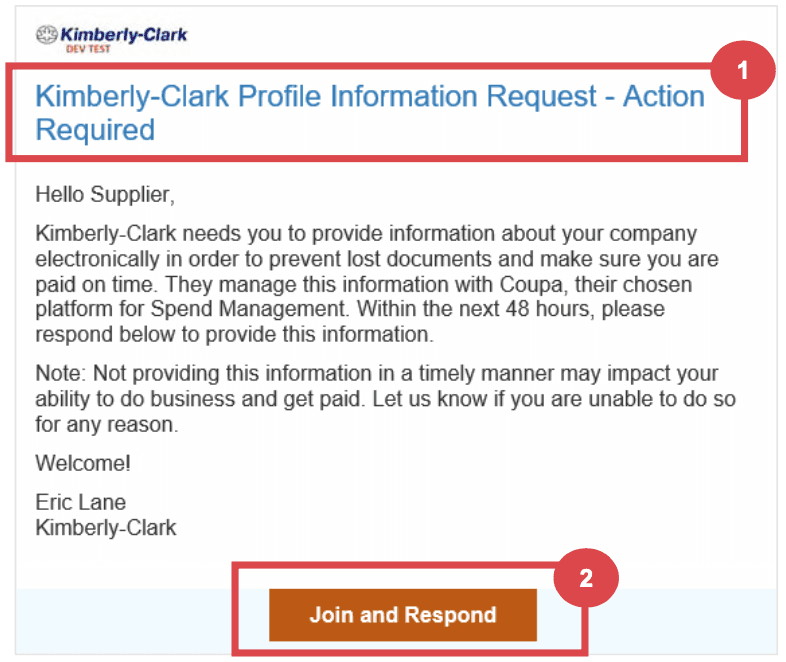
Existing suppliers will receive an email with the subject line: "[Company-Name] Profile Information Request – Action Required."
Click the Join and Respond button from the email.
Log in to the Coupa Supplier Portal with your credentials.
Click the Profile tab on the Coupa Supplier Portal home screen.
Complete or update the Supplier External Update Form as needed.
Step 9: Completing Financial and Legal Assessments
Email Invitation for Assessments
Suppliers may receive an email to complete a Financial and Legal Assessment.
Click the link in the email to access the assessment.
Provide all required financial and legal information.
Click the Submit button once the form is complete.
Step 10: Delegating Financial and Legal Assessments
Delegation Process
At the bottom of the assessment, select Delegate to assign the task to another individual.
Confirm the delegation and enter the delegate’s details.
The delegate will receive an email notification to complete the assessment.
Step 10: Updating General Information
Profile Updates
From the CSP home screen, click the Profile tab.
Select the area of the profile that requires editing.
Click the Edit Section button and provide any updates.
Save the changes by clicking Save changes or Save & Go to Next.
Additional Considerations
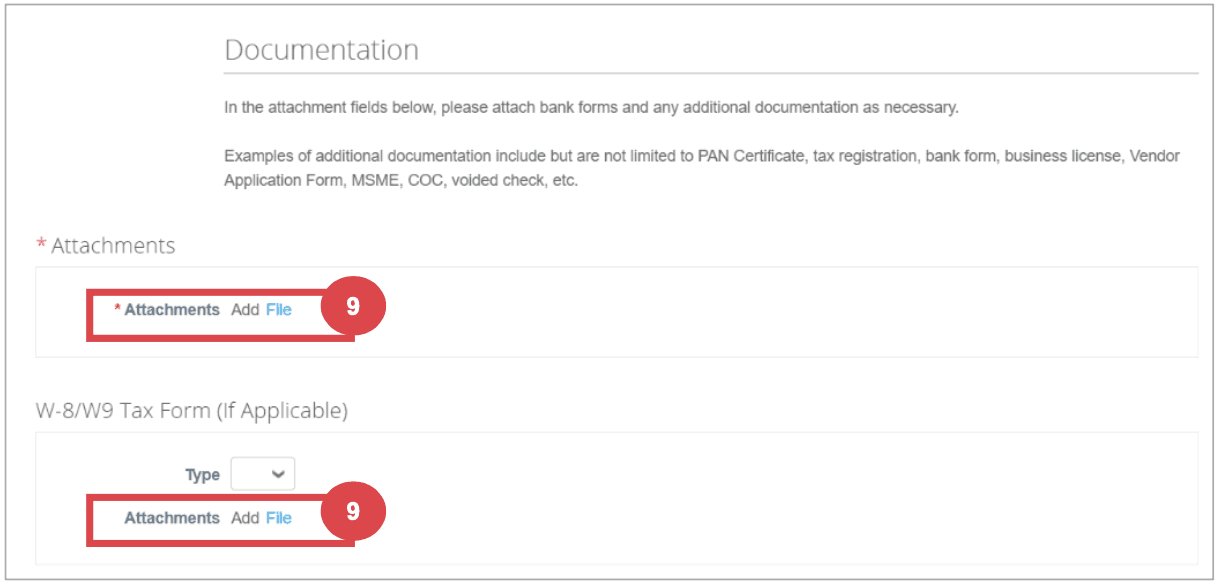
Document Attachments
Attach any relevant banking and tax documents, such as voided checks, tax forms, and certificates.
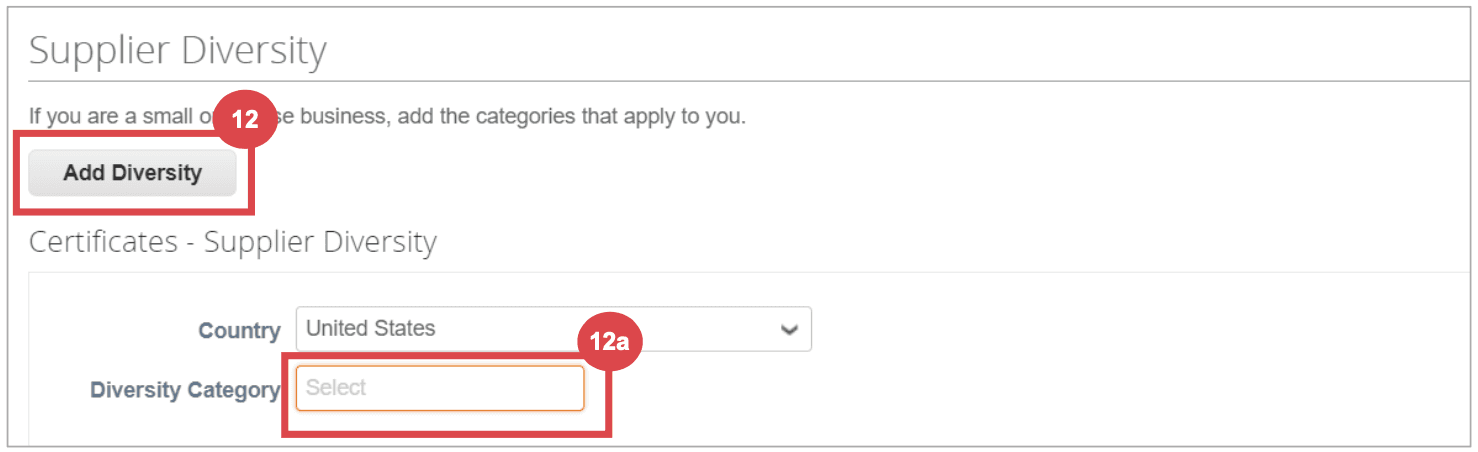
Diversity Information
Optionally add diversity details by selecting the appropriate categories.
Contact Information
Provide a Product Safety and Manufacturing Quality point of contact and verify the PO email address.
Here’s a link to Kimberley Clarks online Coupa help doc for the full version which was summarized above
Conclusion
The onboarding process for influencers on Coupa involves multiple detailed steps and careful attention to ensure all information is accurate and complete. The complexity of this process, especially at scale, underscores the advantages of utilizing a specialized platform like Lumanu, which simplifies and streamlines influencer payments and management.
Comprehensive Guide to Onboarding Influencers to Coupa
Onboarding influencers to Coupa can be a time-consuming process. This guide will walk you through each step in detail, ensuring a thorough understanding of the typical process and requirements involved.
Part 1 covers the steps by the marketing team and Part 2 covers the steps that influencers must take during their onboarding process. Many companies build out a pdf laying out the step by step process, we’ve included example screenshots from publicly available onboarding guides used in practice.
When managing a few freelancers, this process is manageable. As the number of freelancers scale it may be time to consider using a specialized platform like Lumanu that works alongside Coupa as a master vendor for influencer and other marketing freelancer onboarding and payments, providing a more efficient and streamlined process.
Part 1: Marketing Team's Interaction with Influencers to Get Them Setup as Vendors in Coupa
Step 1: Set Expectations with Influencers
Communication
Prepare and handoff an onboarding guide (Part 2 contains detailed steps)
Communicate with influencers to ensure they understand the process and that they receive the email invitation from Coupa.
Guide them through the account creation and profile completion steps if needed.
Step 2: Initiating the Onboarding Process
Requesting Onboarding
Fill out a New Supplier Request Form to initiate the influencer onboarding process.
Submit the form to trigger the Supplier External Update Form which will notify your vendor.
Step 3: Contract Preparation and Approval
Drafting Contracts
Use Coupa’s contract request interface to prepare agreements.
Submit the draft for approval through Coupa, ensuring all necessary senior leadership and departmental heads review and sign off.
Handling Feedback
Address any feedback or changes requested by finance or legal departments.
Step 4: Influencer Onboarding
Vendor Setup
Once the contract is approved, onboard the influencer in the Coupa system.
Ensure all financial documents (e.g., W9, banking details) are collected and uploaded.
Step 5: Creating Purchase Orders (POs)
PO Generation
After the influencer is set up as a vendor, generate a Purchase Order (PO) for the influencer.
Ensure the PO includes all necessary details, such as services provided and payment terms.
Step 6: Managing Invoices and Payments
Invoice Submission
Inform influencers to generate and submit invoices through Coupa, ensuring they include the PO number.
Once submitted, verify that the invoices match the PO details and approve them in the system.
Payment Processing
Coordinate with the finance team to ensure timely processing of payments according to the agreed terms.
Ensure there is an emergency onboarding and manual entry process in place to use when necessary to expedite payments.
Step 7: Monitoring and Troubleshooting
Tracking and Reporting
Maintain a tracker (i.e. spreadsheet) to monitor the status of contracts, POs, and payments.
Address any issues or discrepancies that arise, working with influencers and the finance team to resolve them promptly.
Accruals and Reconciliations
Ensure all expenses are correctly communicated to Finance to be accrued and reconciled in the system, matching invoices to the appropriate budget months.
Part 2: Influencer Onboarding Process
Step 1: Setting up a New Supplier Profile on Coupa
Email Invitation
Influencers will receive an email invitation from Coupa (do_not_reply@supplier.coupahost.com) with the subject line: "You are Connected to [Company] on Coupa."
Login to Coupa
Click the Login to Coupa button from the invitation email.
Step 2: Creating an Account
Account Information
Enter the required information:
Business Name
Email address
First Name (primary contact)
Last Name (primary contact)
Password (alphanumeric, minimum 8 characters)
Accept the Privacy Policy and Terms of Use by checking the corresponding box.
Click the Create an Account button.
Click Log In if you have an existing account
Step 3: Completing Company Information
Business Details
Enter your business details in the required fields:
Company Name
Country/Region
Address
City
State
Postal Code
Check the Invoice-from location box if the address is your invoice address.
Deselect the Pay to location (Remit-To) and Ship from location checkboxes if they do not apply.
Select the We support integration for invoicing checkbox if you plan to use cXML or SFTP transactions.
Step 4: Entering Tax Information
Tax Details
Select your tax country/region from the dropdown list.
Enter your Tax ID information or select the I don’t have a Tax ID Number checkbox if applicable.
Click the Next button.
Step 5: Payment Discount Preferences (if enabled)
Preferences
Click Next within the Payment Discount Preferences pop-up without entering any information.
Step 6: Coupa Profile Enhancement
Profile Enhancement
Select Do it later on the Enhance your Coupa profile screen. Enhancements are optional and not necessary for registration.
Step 7: Add remit to and banking details
Select the radio button option Yes or No for the Do you need to add a Remit To/Bank Details? question to add or update banking information.
Click the Add Remit To button to add or update banking information.
The Choose Remit-To Address screen appears.
a. Click the Choose button to add existing banking information.
b. Click the Create New Remit-To Address button to add new banking information.
Step 8: Updating an Existing Supplier Profile
Email Invitation for Updates
Existing suppliers will receive an email with the subject line: "[Company-Name] Profile Information Request – Action Required."
Click the Join and Respond button from the email.
Log in to the Coupa Supplier Portal with your credentials.
Click the Profile tab on the Coupa Supplier Portal home screen.
Complete or update the Supplier External Update Form as needed.
Step 9: Completing Financial and Legal Assessments
Email Invitation for Assessments
Suppliers may receive an email to complete a Financial and Legal Assessment.
Click the link in the email to access the assessment.
Provide all required financial and legal information.
Click the Submit button once the form is complete.
Step 10: Delegating Financial and Legal Assessments
Delegation Process
At the bottom of the assessment, select Delegate to assign the task to another individual.
Confirm the delegation and enter the delegate’s details.
The delegate will receive an email notification to complete the assessment.
Step 10: Updating General Information
Profile Updates
From the CSP home screen, click the Profile tab.
Select the area of the profile that requires editing.
Click the Edit Section button and provide any updates.
Save the changes by clicking Save changes or Save & Go to Next.
Additional Considerations
Document Attachments
Attach any relevant banking and tax documents, such as voided checks, tax forms, and certificates.
Diversity Information
Optionally add diversity details by selecting the appropriate categories.
Contact Information
Provide a Product Safety and Manufacturing Quality point of contact and verify the PO email address.
Here’s a link to Kimberley Clarks online Coupa help doc for the full version which was summarized above
Conclusion
The onboarding process for influencers on Coupa involves multiple detailed steps and careful attention to ensure all information is accurate and complete. The complexity of this process, especially at scale, underscores the advantages of utilizing a specialized platform like Lumanu, which simplifies and streamlines influencer payments and management.
By
Lumanu
Jul 23, 2024


© 2025 Lumanu, Inc. All Rights Reserved.
Lumanu, Inc. is a financial technology company and not a bank
Banking services provided by i3 bank; Member FDIC
© 2025 Lumanu, Inc. All Rights Reserved.
Lumanu, Inc. is a financial technology company and not a bank Banking services provided by i3 bank; Member FDIC
© 2025 Lumanu, Inc. All Rights Reserved.
Lumanu, Inc. is a financial technology company and not a bank
Banking services provided by i3 bank; Member FDIC
© 2025 Lumanu, Inc. All Rights Reserved.
Lumanu, Inc. is a financial technology company and not a bank
Banking services provided by i3 bank; Member FDIC
© 2025 Lumanu, Inc. All Rights Reserved.
Lumanu, Inc. is a financial technology company and not a bank
Banking services provided by i3 bank; Member FDIC